Text-based Instagram Notes are available and are valid for 24 hours. They’re best characterized in that regard as a hybrid of Twitter posts and Instagram Stories.
Though Notes may be trickier to use than Instagram Stories and, particularly for users who are new to this service. In this article will explain to you How to Get Notes on Instagram?
How to Create Instagram Notes on iPhone and Android?
Instagram Notes are a way to communicate with your followers and keep up with their activities. They can contain up to 60 characters or emojis and, as was previously noted, are accessible on your account for 24 hours. In your and other people’s DMs, the material appears as a thinking bubble above your profile icon.
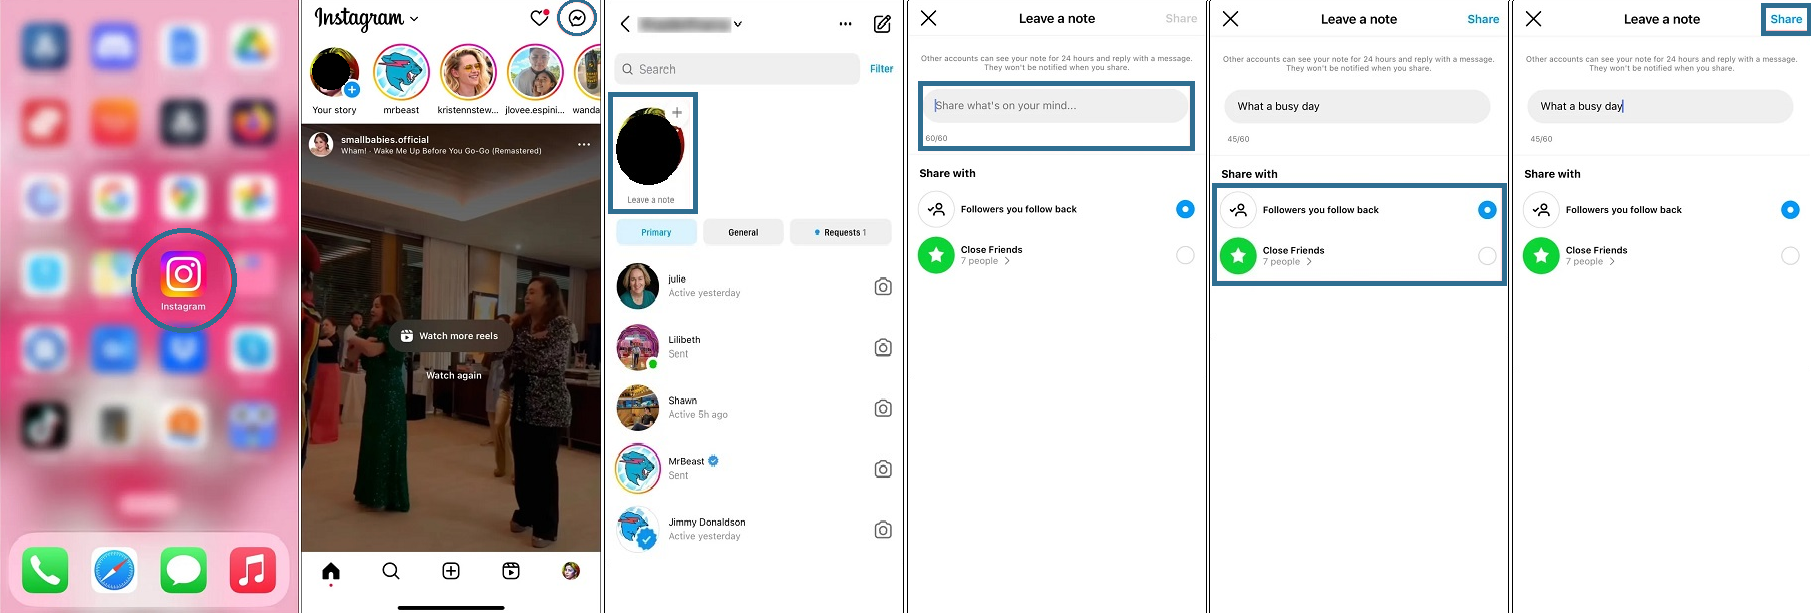
Making Instagram Notes is the same on both iPhone and Android smartphones, despite some minor changes in Instagram functionality. On both devices, follow these steps to locate and Get Notes on Instagram.
- Open the Instagram application.
- In the top right corner, select the “Messages” icon.
- At the top of your chat list, tap your profile picture.
- Write up to 60 characters in the section that reads, “Share what’s on your mind.”
- Choose whether you want to share your Note with all of your followers or just your close friends under “Share.”
- When you tap “Share” in the top right corner of “Messages,” a text-filled bubble will pop up above your icon.
Now, whenever your friends access the “Messages” section, they can reply to your Note and view it. On their Notes, you can also view and leave a message. Your chat with that person will display their responses, but only they can see them.
How to Delete Instagram Notes on iPhone and Android
You can only post one Note at a time on Instagram. You don’t have to wait till the 24-hour period has passed before posting the subsequent one, though. You can always remove it or substitute a new Note for it.
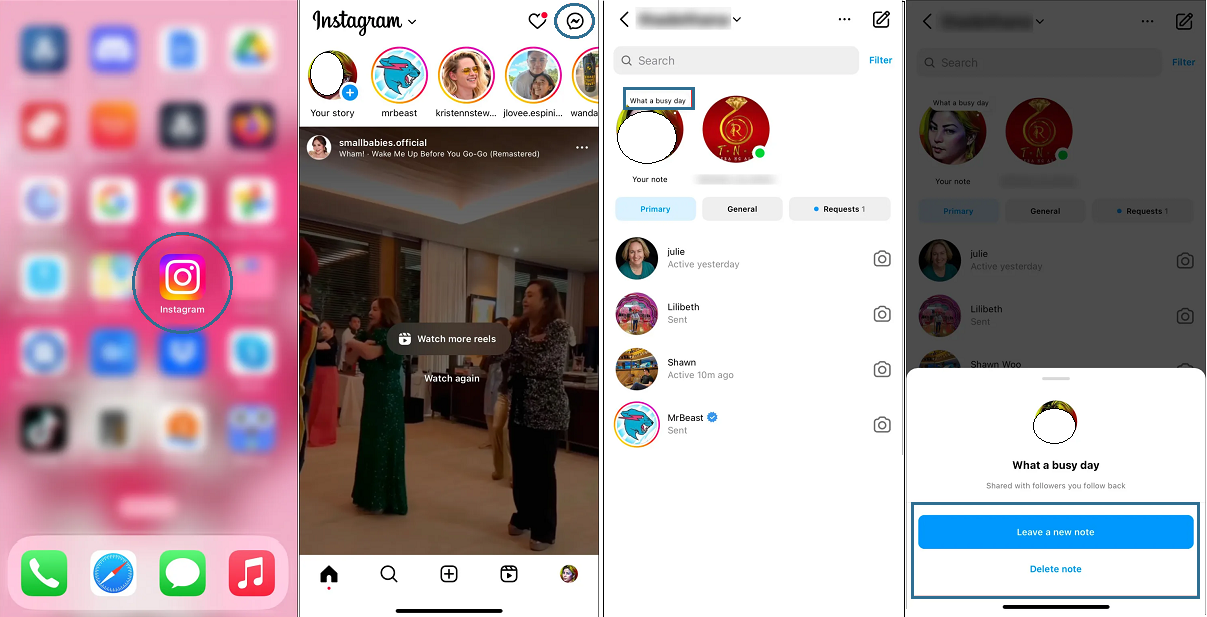
Here is how to Delete Instagram Notes:
- Launch Instagram App.
- In the top right corner, tap the “Messages” icon.
- On your Note, tap.
- Select between leaving a new Note or removing the current one.
Conclusion
Apart from Instagram Videos, Stories, posts, and Reels are Instagram Notes. They offer a novel way to keep your friends informed about your life. However, just like other recent additions to Instagram, it can be difficult at first to comprehend how Notes operate. With any luck, this article has clarified how How to Get Notes on Instagram so you can easily publish them.
How to Get Notes on Instagram FAQs
Do other people see when I upload Instagram Notes?
When you post a Note, no one else will be notified. However, by touching on it in their messages, they will be able to see when you posted a Note.
How can I tell if a chat message is a response to one of my notes?
The platform will note if the message in your chat is a reply to your Notes by writing “Replied to your note” above the text of a particular Note, just like with Instagram Stories.
Can I report Notes made by other people?
You can report someone’s Notes by touching and holding the Note, then clicking “Report” and selecting the problem.
Can I find out who is seeing my Notes?
You cannot see who has viewed your Notes, in contrast to Instagram Stories. Additionally, nobody else can see who has viewed your Notes.
How can I quickly create an Instagram Note?
Using the straightforward instructions below, you can add a note on Instagram:
- Visit Instagram.
- Click on Messages.
- Press on + Leave A Note by tapping your profile photo.
- Write down whatever you want to, then click Share.
Can an Instagram Note be deleted?
An Instagram Note can be simply deleted, yes. To do this:
- Go to your Inbox on Instagram after opening it.
- Long-press the message after clicking on it.
- To delete a note, click.


